Upgrade PMM Server on AWS
Change Public IP address
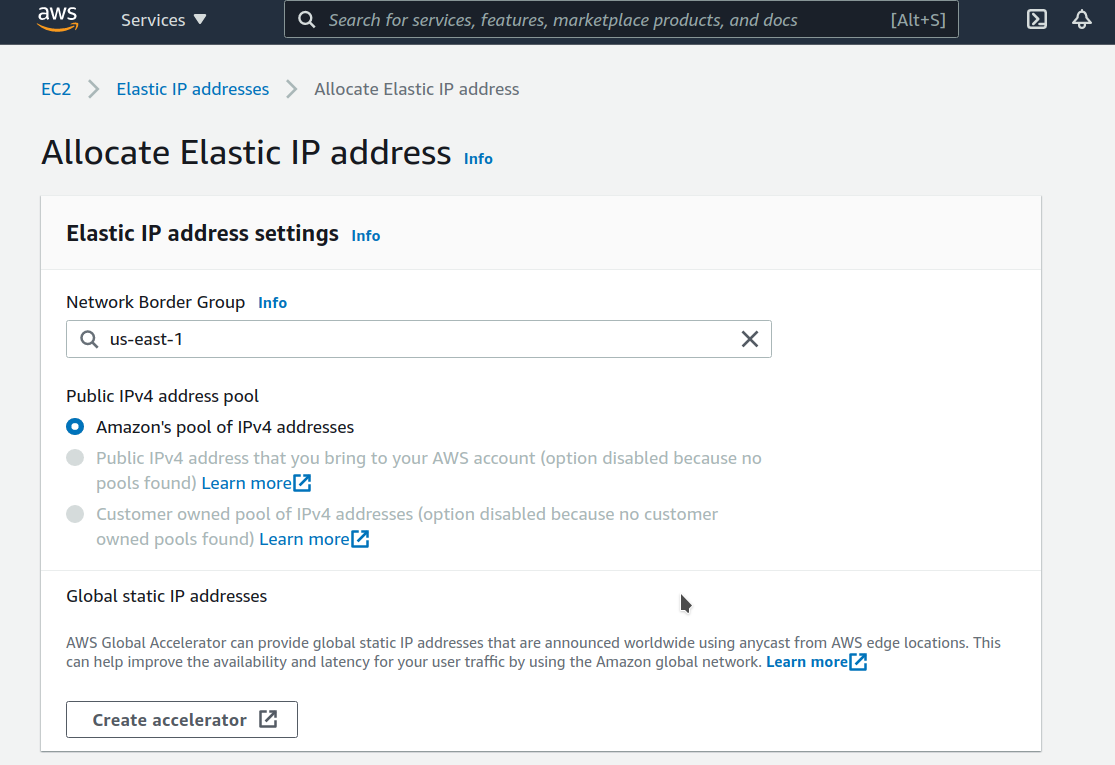
To assign a public IP address for an Amazon EC2 instance, follow these steps:
-
Allocate Elastic IP address
-
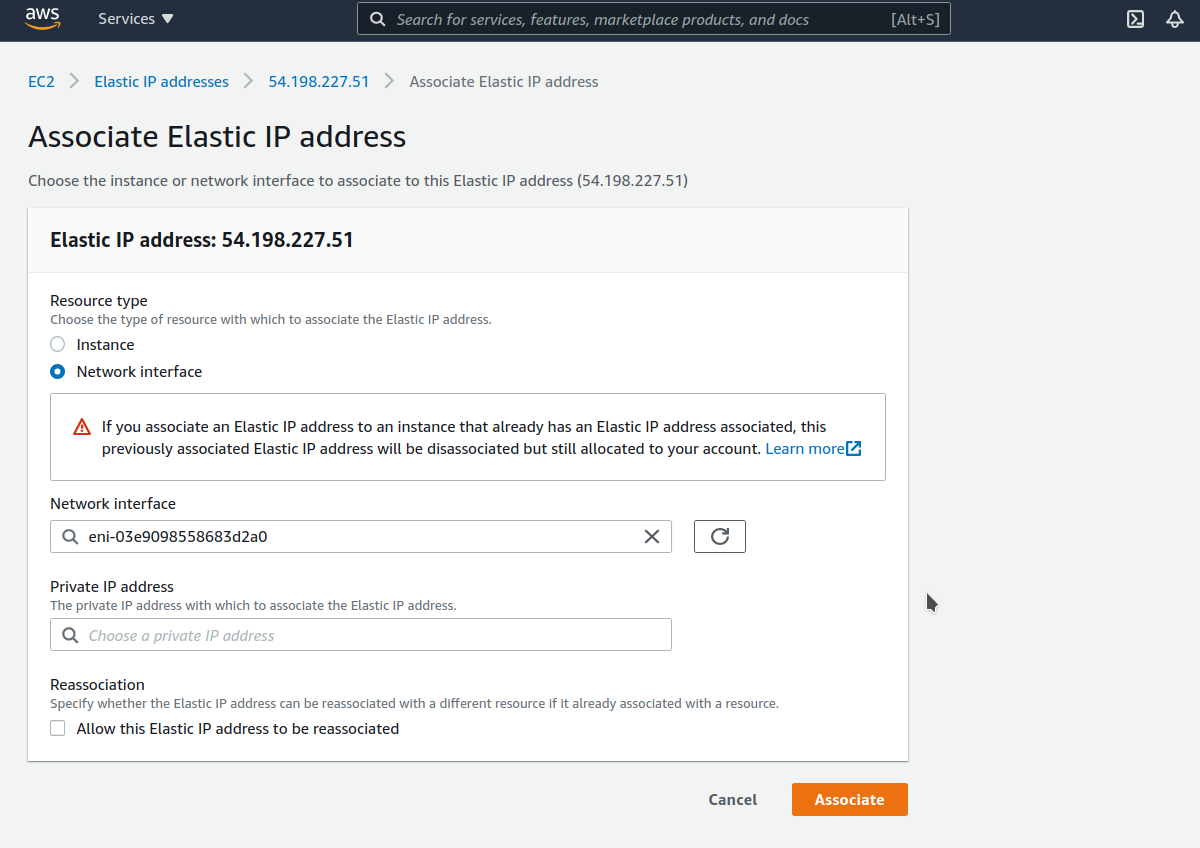
Associate Elastic IP address with a Network interface ID of your EC2 instance
If you associate an Elastic IP address to an instance that already has an Elastic IP address associated, this previously associated Elastic IP address will be disassociated but still allocated to your account.
Upgrade EC2 instance class
Upgrading to a larger EC2 instance class is supported by PMM provided you follow the instructions from the AWS manual. The PMM AMI image uses a distinct EBS volume for the PMM data volume which permits independent resizing of the EC2 instance without impacting the EBS volume.
-
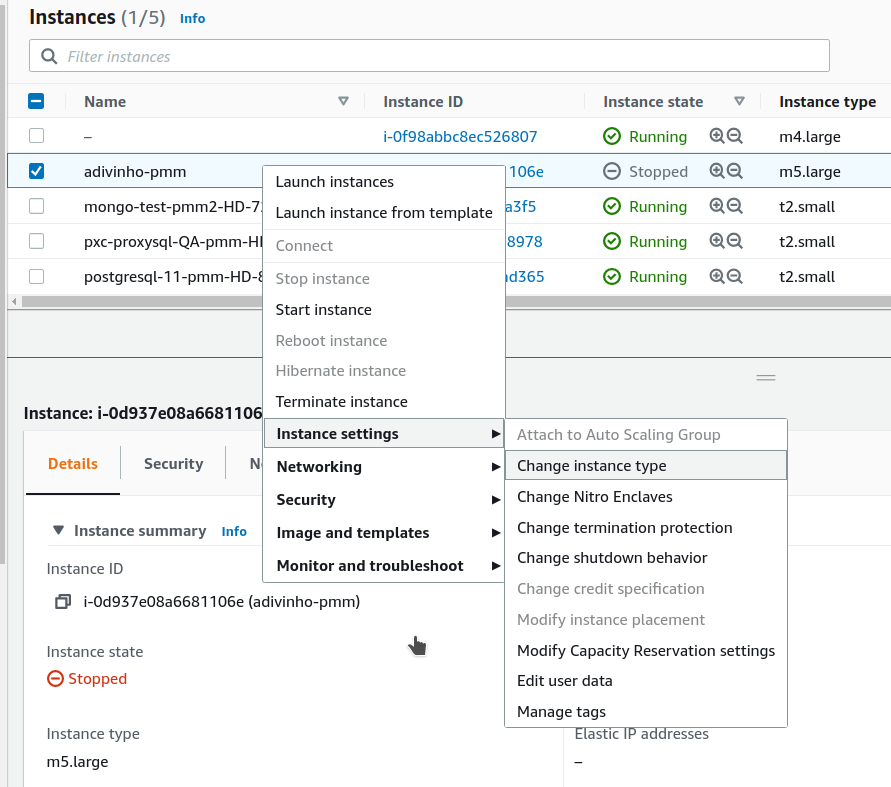
Open the Amazon EC2 console.
-
In the navigation pane, choose PMM Server Instances.
-
Select the instance and choose Actions, Instance state, Stop instance.
-
In the Change instance type dialog box, select the instance type that you want.
-
Choose Apply to accept the new settings and start the stopped instance.
Expand PMM Data EBS Volume
The PMM data volume is mounted as an XFS formatted volume on top of an LVM volume. There are two ways to increase this volume size:
-
Add a new disk via EC2 console or API, and expand the LVM volume to include the new disk volume.
-
Expand existing EBS volume and grow the LVM volume.
Expand existing EBS volume
To expand the existing EBS volume for increased capacity, follow these steps.
-
Expand the disk from AWS Console/CLI to the desired capacity.
-
Login to the PMM EC2 instance and verify that the disk capacity has increased. For example, if you have expanded your disk from 16G to 32G,
dmesgoutput should look like below:[ 535.994494] xvdb: detected capacity change from 17179869184 to 34359738368 -
You can check information about volume groups and logical volumes with the
vgsandlvscommands:vgsVG #PV #LV #SN Attr VSize VFree DataVG 1 2 0 wz--n- <16.00g 0lvsLV VG Attr LSize Pool Origin Data% Meta% Move Log Cpy%Sync Convert DataLV DataVG Vwi-aotz-- <12.80g ThinPool 1.74 ThinPool DataVG twi-aotz-- 15.96g 1.39 1.29 -
Now we can use the
lsblkcommand to see that our disk size has been identified by the kernel correctly, but LVM2 is not yet aware of the new size. We can usepvresizeto make sure the PV device reflects the new size. Oncepvresizeis executed, we can see that the VG has the new free space available.lsblk | grep xvdbxvdb 202:16 0 32G 0 diskpvscanPV /dev/xvdb VG DataVG lvm2 [<16.00 GiB / 0 free] Total: 1 [<16.00 GiB] / in use: 1 [<16.00 GiB] / in no VG: 0 [0 ]pvresize /dev/xvdbPhysical volume "/dev/xvdb" changed 1 physical volume(s) resized / 0 physical volume(s) not resizedpvsPV VG Fmt Attr PSize PFree /dev/xvdb DataVG lvm2 a-- <32.00g 16.00g -
We then extend our logical volume. Since the PMM image uses thin provisioning, we need to extend both the pool and the volume:
lvsLV VG Attr LSize Pool Origin Data% Meta% Move Log Cpy%Sync Convert DataLV DataVG Vwi-aotz-- <12.80g ThinPool 1.77 ThinPool DataVG twi-aotz-- 15.96g 1.42 1.32lvextend /dev/mapper/DataVG-ThinPool -l 100%VGSize of logical volume DataVG/ThinPool_tdata changed from 16.00 GiB (4096 extents) to 31.96 GiB (8183 extents). Logical volume DataVG/ThinPool_tdata successfully resized.lvsLV VG Attr LSize Pool Origin Data% Meta% Move Log Cpy%Sync Convert DataLV DataVG Vwi-aotz-- <12.80g ThinPool 1.77 ThinPool DataVG twi-aotz-- 31.96g 0.71 1.71 -
Once the pool and volumes have been extended, we need to now extend the thin volume to consume the newly available space. In this example we’ve grown available space to almost 32GB, and already consumed 12GB, so we’re extending an additional 19GB:
lvsLV VG Attr LSize Pool Origin Data% Meta% Move Log Cpy%Sync Convert DataLV DataVG Vwi-aotz-- <12.80g ThinPool 1.77 ThinPool DataVG twi-aotz-- 31.96g 0.71 1.71lvextend /dev/mapper/DataVG-DataLV -L +19GSize of logical volume DataVG/DataLV changed from <12.80 GiB (3276 extents) to <31.80 GiB (8140 extents). Logical volume DataVG/DataLV successfully resized.lvsLV VG Attr LSize Pool Origin Data% Meta% Move Log Cpy%Sync Convert DataLV DataVG Vwi-aotz-- <31.80g ThinPool 0.71 ThinPool DataVG twi-aotz-- 31.96g 0.71 1.71 -
We then expand the XFS file system to reflect the new size using
xfs_growfs, and confirm the file system is accurate using thedfcommand.df -h /srvFilesystem Size Used Avail Use% Mounted on /dev/mapper/DataVG-DataLV 13G 249M 13G 2% /srvxfs_growfs /srvmeta-data=/dev/mapper/DataVG-DataLV isize=512 agcount=103, agsize=32752 blks = sectsz=512 attr=2, projid32bit=1 = crc=1 finobt=0 spinodes=0 data = bsize=4096 blocks=3354624, imaxpct=25 = sunit=16 swidth=16 blks naming =version 2 bsize=4096 ascii-ci=0 ftype=1 log =internal bsize=4096 blocks=768, version=2 = sectsz=512 sunit=16 blks, lazy-count=1 realtime =none extsz=4096 blocks=0, rtextents=0 data blocks changed from 3354624 to 8335360df -h /srvFilesystem Size Used Avail Use% Mounted on /dev/mapper/DataVG-DataLV 32G 254M 32G 1% /srv
Expand Amazon EBS root volume
To expand the Amazon EBS root volume:
-
Expand the disk from AWS Console/CLI to the desired capacity.
-
Login to the PMM EC2 instance and verify that the disk capacity has increased. For example, if you have expanded disk from 8G to 10G,
dmesgoutput should look like below:# dmesg | grep "capacity change" [63175.044762] nvme0n1: detected capacity change from 8589934592 to 10737418240 -
Use the
lsblkcommand to see that our disk size has been identified by the kernel correctly, but LVM2 is not yet aware of the new size.# lsblk NAME MAJ:MIN RM SIZE RO TYPE MOUNTPOINT nvme0n1 259:1 0 10G 0 disk └─nvme0n1p1 259:2 0 8G 0 part / ... -
For volumes that have a partition, such as the root volume shown in the previous step, use the
growpartcommand to extend the partition.# growpart /dev/nvme0n1 1 CHANGED: partition=1 start=2048 old: size=16775168 end=16777216 new: size=20969439 end=20971487 -
To verify that the partition reflects the increased volume size, use the
lsblkcommand again.# lsblk NAME MAJ:MIN RM SIZE RO TYPE MOUNTPOINT nvme0n1 259:1 0 10G 0 disk └─nvme0n1p1 259:2 0 10G 0 part / ... -
Extend the XFS file system on the root volume by
xfs_growfscommand. I# xfs_growfs -d / meta-data=/dev/nvme0n1p1 isize=512 agcount=4, agsize=524224 blks = sectsz=512 attr=2, projid32bit=1 = crc=1 finobt=0 spinodes=0 data = bsize=4096 blocks=2096896, imaxpct=25 = sunit=0 swidth=0 blks naming =version 2 bsize=4096 ascii-ci=0 ftype=1 log =internal bsize=4096 blocks=2560, version=2 = sectsz=512 sunit=0 blks, lazy-count=1 realtime =none extsz=4096 blocks=0, rtextents=0 data blocks changed from 2096896 to 2621120 -
Verify that file system reflects the increased volume size
# df -hT /
Filesystem     Type  Size  Used Avail Use% Mounted on
/dev/nvme0n1p1 xfs    10G  5,6G  4,5G  56% /
Get expert help
If you need assistance, visit the community forum for comprehensive and free database knowledge, or contact our Percona Database Experts for professional support and services.